


Image Transformation with React and Cloudinary: Generating Personalized Display Images

One way events are publicized is by creating customized display images (DPs) that can be shared across all social media platforms by the would-be attendees.
The aim of this article is to teach you how attendees can generate personalized display images for your event. For this article, I would be using React, Cloudinary, and Filesaver.js. I assume you have prior knowledge of React and you also have Node.js installed.
If you don’t have an account on Cloudinary create one here. You also need to have to React installed on your system. Instructions here or could just clone my project repo here and run npm install to install project dependencies for the project. I also assume that you already have a background image you want to use for your DP. See mine below
 Background image with space for a person’s image and name
Let's outline our processes before proceeding 💁
First, we create our react project
Then we set up our Cloudinary image and background image
We then upload the user's image and overlay it on our background image and then download the personalized image.
Step 1: Create our React Project
We would be using create-react-app in this tutorial to create our project. You can check out the React docs for more info.
Simply open your terminal in a directory of your choice and type the following commands. This would help us set up our React project.
Kindly run the following commands
create-react-app <project-name>cd <project-name>npm installoryarndepending on the package manager of your choicenpm install dotenv --saveto help us with our environmental variablestouch .envto create a .env file in your project rootnpm install axios --saveWe would use this to make requests to the Cloudinary servernpm install file-saver --saveThis would help us to save the image generatedcode .to open the project in Visual Studio Code. (If you don't have VS code installed, you can use any text editor of your choice)
The above commands would create a new react project. We would be dealing with majorly the App.js ,App.css and the .envfiles in the project. So let's move to step 2.
Step 2: Setup Cloudinary and Background image
I assume at this point that you have already created your Cloudinary account. So before we upload the image we would do need your Cloudinary cloud name and the Cloudinary upload preset. We would save this in our .env file.
To get your upload preset:
Open up your settings
Click on the upload tab
Locate upload presets towards the bottom of the page. If it’s isn't enabled, enable it and then copy the presets given to you. You could edit it if you wish
Head over to your
.envfile and save in the following formatREACT_APP_CLOUDINARY_UPLOAD_PRESET=your-preset
 Image showing where you can get your upload presets
You can get your cloud name from your dashboard. Save into your .env file with the format REACT_APP_CLOUDINARY_CLOUD_NAME=your-cloudname
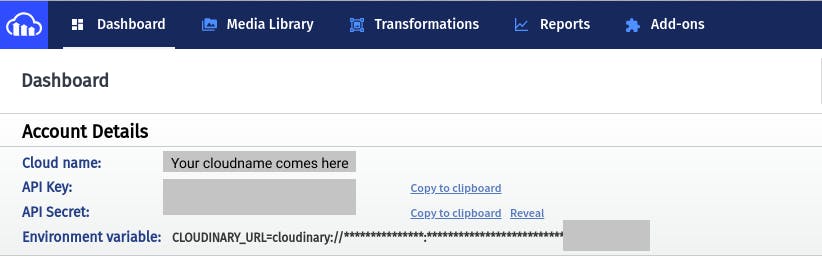 Image showing where you can get your cloudname
Now finally for our setup. Upload your background image to Cloudinary. You can simply open the Media Library tab and drag the image to upload. After uploading the image copy the public_id of the image and add to your .env file in the format REACT_APP_IMAGE_OVERLAY=public_id
Each uploaded image is in the form of a URL in this format: [https://res.cloudinary.com/cloud_name/image/upload/v12222/public_id.filetype.](res.cloudinary.com/cloud_name/image/upload/..)
Kindly ensure your copy with the file type.
Step 3: Upload the image to Cloudinary and overlay with the background image, then download the image
I assume that you are already familiar with React and would just post images of the code and explain.
This section would be in 3 parts
Setup of the React component to get the image from the user’s device and save to state
We upload the image
We use the public id of the image uploaded to overlay it with the background image and download the generated image.
Setting up the React Component State object where we save all our data.
  constructor(props) {
    super(props);
    this.state = {
      text: "",
      file: null,
      error: " ",
      pictures: [],
      imagePreviewUrl: "",
      name: "",
      loading: false
    };
    this.onSubmit = this.onSubmit.bind(this);
    this.handleChange = this.handleChange.bind(this);
    this._handleImageChange = this._handleImageChange.bind(this);

  }
React Render method: This is basically the component that gets the image from the user’s device. It contains two input tags one for the image and the other for the user’s name. It also contains some classes for styling.
return (
      <div className="App">
        <div className='row'>
          <div className='col-md-6 upload'>
            <p className="info">Upload your image here</p>
            <p className='error'>{this.state.error}</p><br />
            <form onSubmit={this.onSubmit}>
              <input className="fileInput "
                type="file"
                accept='image/*'
                onChange={(e) => this._handleImageChange(e)} />
              <div className="imgPreview">
                {imagePreview}
              </div>
              <div className="form-group">
                <input type="text" className="form-control" value={this.state.name} placeholder="Enter name here" onChange={this.handleChange} />
              </div>
              <input type="submit" value="Create Image" className="btn btn-primary mb-2 upload-btn" />
            </form>
          </div>
        </div>
      </div>
    );
On change method: this handles the user’s name input
  handleChange(event) {
    this.setState({ name: event.target.value });
  }
Image change method: this handles the selection of files from the user’s device
  _handleImageChange(e) {
    e.preventDefault();

    let reader = new FileReader();
    let file = e.target.files[0];

    reader.onloadend = () => {
      this.setState({
        file: file,
        imagePreviewUrl: reader.result
      });
    }

    reader.readAsDataURL(file)
  }
Submit method: this handles image upload to Cloudinary.
We would be using the upload URL with follows the format axios.post(https://api.cloudinary.com/v1_1/cloud_name/image/upload/, formData).
Note that the cloud_name is what we earlier copied from your Cloudinary dashboard. Formdata is used to upload images in Javascript you can read up about it here.
    e.preventDefault();
    this.setState({ error: "" });
    this.setState({ loading: true });
    const self = this;
    const formData = new FormData();
    formData.append("file", this.state.file);
    formData.append(
      "upload_preset",
      process.env.REACT_APP_CLOUDINARY_UPLOAD_PRESET
    );

    //Upload Image
    axios
      .post(
        `https://api.cloudinary.com/v1_1/${process.env.REACT_APP_CLOUDINARY_CLOUD_NAME}/image/upload/`,
        formData
      )
      .then(function (response) {
        console.log(response.data.public_id);
        self.addOverlay(response);
      })
The above code snippet uploads the image to Cloudinary. Notice how we are using our environmental variables in the API call. The API returns the public_id of the uploaded image and this is used for the image overlay.
We then pass the public_id to the addOverlay method to help process the overlay effect.
Overlay Method
This method takes the response of the API call above and overlays it our background image. The API call made here is of the format [https://res.cloudinary.com/cloud-name/image/upload/l_](https://res.cloudinary.com/${process.env.REACT_APP_CLOUDINARY_CLOUD_NAME}/image/upload/l_${)public_id ,h_1300,w_1300,r_max,x_110,y_110/l_text:Futura_92:user's_name,x_1070,y_445/background-image.
l_: This cloudinary property is used to overlay images. The public id of the image to be overlaid is passed alongside the size you want the image to be and the location along the x and y axis that you want the image to be r_max: Ths cloudinary property gives the image a border-raduis property that is proportional the greater of the length or width of the image ltext: This cloudinary image is used to overlay text, the font to be used alongside the text to be overlaid is passed, you also pass the the location along the x and y axis that you want the text to be x: This cloudinary property is used to specify the position of an image or text along the x-axis y_: This cloudinary property is used to specify the position of an image or text along the y-axis
Feel free to play around with the values of x_ and y_ as these depend on your background image.
  addOverlay(response) {
    const self = this;
    axios
      .get(
        `https://res.cloudinary.com/${process.env.REACT_APP_CLOUDINARY_CLOUD_NAME}/image/upload/l_${
        response.data.public_id
        },h_1300,w_1300,r_max,x_110,y_110/l_text:Futura_92:${self.state.name},x_1070,y_445/${process.env.REACT_APP_CLOUDINARY_IMAGE_OVERLAY}`
      )
      .then(function (response) {
        console.log(response);
        console.log(response.config.url);
        self.setState({ url: response.data });
        FileSaver.saveAs(response.config.url, `${self.state.name}.jpg`);
        self.setState({ loading: false });
      })
  }
The response gotten from the above API call contains a property called URL which can use to download the image. We can access the URL using response.confiq.url, we pass this property to our FileSaver reference as seen above and we download the image.
You can see how simple it is to create personalized DPs for your event. Here’s a copy of the completed image
 Sample Generated DP
You can view the GitHub repo with the completed code here. You can also see a live demo of our app here.
Special shoutout to David, Anjola, and Ahmed for reviewing this article. If you enjoyed this post, please share, comment, and give it a couple of claps . . . Maybe it would help someone. You can also follow me on Twitter(I swear, I’m not boring) and on Medium for more informative articles and tutorials.